|
Chris Fedderson — MacroFine Musings ~~~~~~~~~~~~~~~~~~~~~~~~~~~~~~~~~~ I have recently begun to experiment with Contemporary Still Life set-ups and will be showing these in my upcoming solo featured artist show, Curious Pairings. I thought you might like a behind the scenes look at how the process for setting up a still life works, with all the things that you have to prepare and consider. So here it is — your “Backstage Pass” to see the inner workings of how the process evolves. This is my photo studio where I do my set-ups — not too glamorous, I know! The main thing for me is the lighting in this room (3rd floor, Southwest facing). It also helps to have two tables that I can easily adjust in height or move around as needed for set-ups. 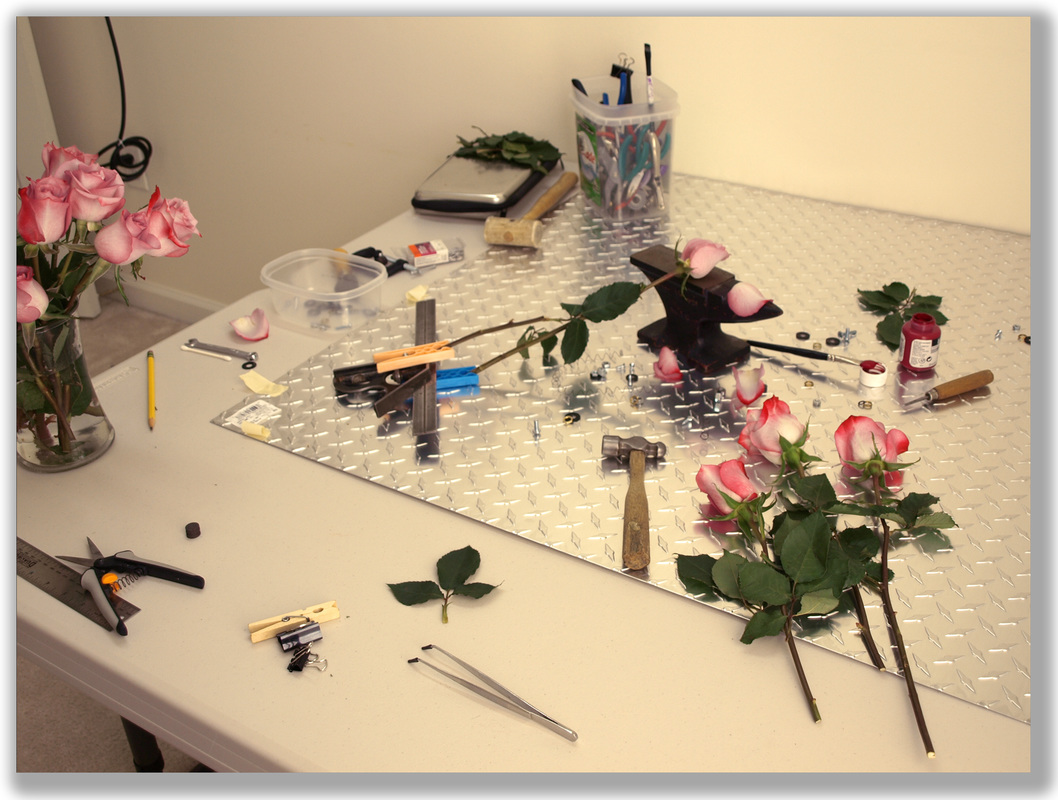 Setting Up a Contemporary Still Life This set-up started with the concept of a Rose being created with hardware and tools and the juxtaposition that would create. I started with Diamond Cut Metal for the backdrop to set the tone. Then I collected a bunch of nuts and bolts, small hand tools, and other hardware-related stuff, for my set dressing. Next I began just scooting elements around to see how they worked together and whether my concept was being portrayed in the result. Here are some of the major considerations/decisions you need to make for a set-up to create your very own Contemporary Still Life.
Wow — it’s crazy what you go through to create these sorts of images. After seeing the mess that led to it, you’ll be surprised how this ended up looking. And now… drumroll please… since you have a backstage pass you get to see the final image! Here you go! 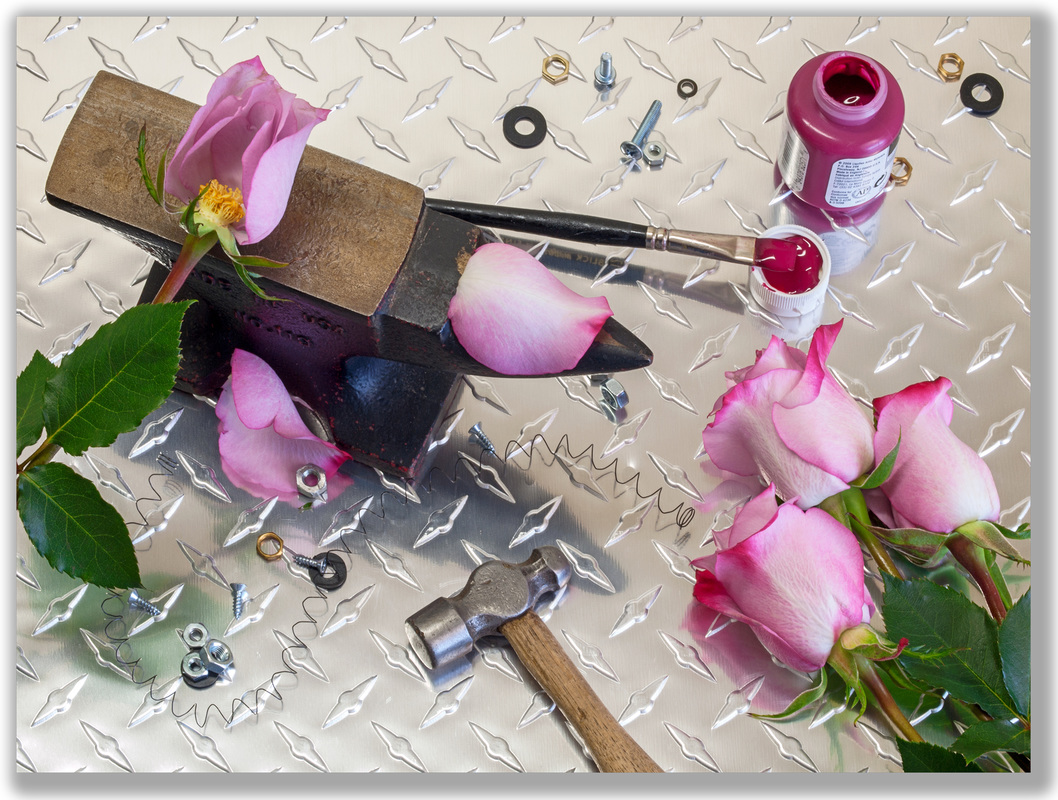 Rose Creation Is it anything at all like what you thought it would be?
Thank you for visiting and share your backstage pass with others, — Chris P. s. Have you ever tried to do a set-up in your studio? Share the experience!
4 Comments
Chris Fedderson — MacroFine Musings Kathy Lawler — Guest Blogger and Resident Color-Guru ~~~~~~~~~~~~~~~~~~~~~~~~~~~~~~~~~~ Ever wonder how to choose a great color scheme for you living space? One way is to start with one of your favorite pieces of art and choose your color scheme based on that work. It can be a painting you love or a photograph you have just purchased. Trust the Artist’s palette, the combination of colors they used and how they work together, and then with those create your own space that you love to be in. Take this beautiful image of a Chinese Elm bark. Bring these wonderful colors of Nature into your living space for an outstanding and inspired interior. Let’s take a look at the color palette you could use with this image. 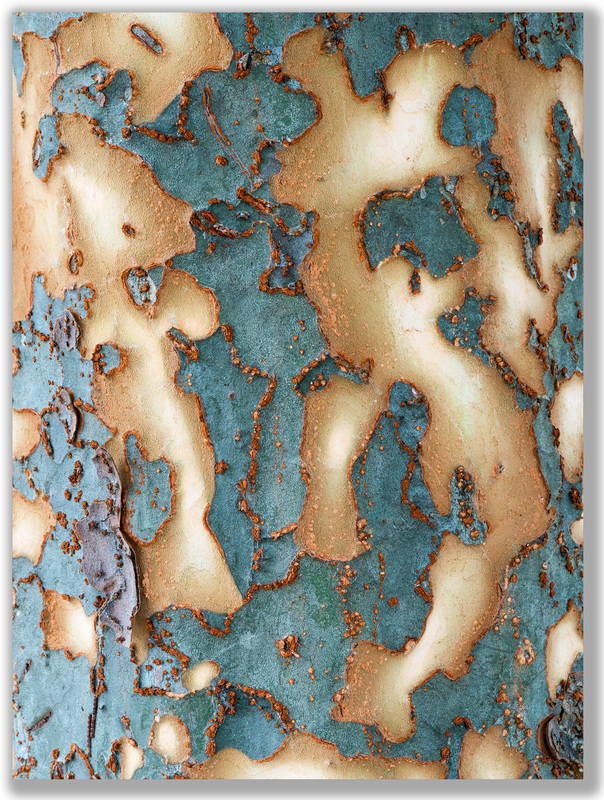 Map of a Tree First we have this luscious shade of mahogany. Pair that with the lovely turquoise and a rich pumpkin and you have a great combination. 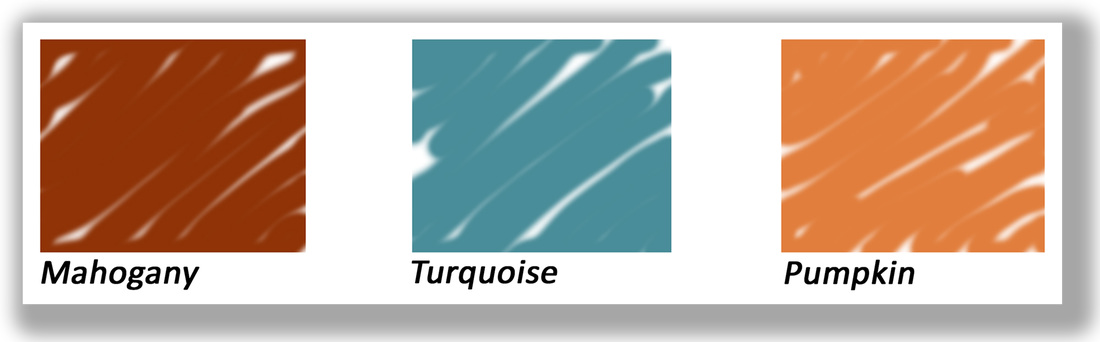 Just three of the many colors in Map of a Tree These aren’t the only colors you can pull from this palette — there are great neutrals with shades of ivory, tans, light blue, steel grays, along with reds, oranges, and whites. You can pump up the volume on the colors by using a more intense version of the shade or you can tone them down or make them lighter as well.
As discussed in a previous blog on Color, there are many approaches you can take with color combinations. Our first two choices from this palette happen to be complimentary colors and make a great basis for this color pairing. Add pumpkin and you have a great accent. One great way to work with color and give your home a sense of flow while changing up the look is to use one of the colors — the turquoise for example — as the primary color for your living room. It then becomes the secondary color in your bedroom and just the accent color in another room while other colors in your palette will become dominant colors for each of those rooms. Learn to experiment and don’t be afraid of color! Color can set a mood in your home — your bedroom can be done in restful shades of blues for a calming effect or you can add some color zing to your kitchen for a bright energetic space. You can make a room appear bigger, cozier, more restful, or more cheery depending on your color selections. Even small amounts of accent colors bring life into a space. There are several ways to experiment with color. I do recommend experimenting with painting your walls, using throw pillows, adding new art and accessories that can be relatively inexpensive upgrades and are easy to change. Thank you for visiting… and remember to color outside the lines! — Kathy P.s. See our Change of Art blog for additional color ideas for your home. |
Categories
All

About Chris
I am a Virginia-based photographer and gather my images while hiking in parks and natural areas here at home and in the locations I travel to. I also love to visit arboretums and botanic gardens to find unusual and exotic subjects. Archives
March 2017
|
 RSS Feed