MacroFine Photography
  • Home
  • Artist
    • Behind the Scenes
    • Shows and Exhibitions
    • Endorsements
  • Contact
  • Room Views
  • Shop
  • Home
  • Artist
    • Behind the Scenes
    • Shows and Exhibitions
    • Endorsements
  • Contact
  • Room Views
  • Shop
Search

. . . And Then There Was Light

2/9/2016

2 Comments

 
Chris Fedderson — MacroFine Musings

[This post is an elaboration on the third point I made in my post of November 10, 2015,
Five ways to raise your photo IQ (Interest Quotient)]
 ~~~~~~~~~~~~~~~~~~~~~~~~~~~~~~~~~~~~

But not just any light . . .

Is it sunlight?  Fluorescent light?  Candle light?  Side light?  Back light?  Bright light? Diffused light?  Colored light?  Mottled light?  Half-shadowed light?  It gets worse… what temperature is the light?  I don’t mean is it a hot day or a freezing day, but rather, what is the Kelvin Color Temperature?
 
From Wikipedia:
The color temperature of a light source is the temperature of an ideal black-body radiator that radiates light of comparable hue to that of the light source.
 
What does that mean?!  Yeah, I don’t know either.  At least not in all its Technicolor Glory.
 
In general terms, though, the Color Temperature that White Balance refers to is where a particular light falls on a scale from warm to cool, and covering this fully would be a book in itself.  Your camera manual will likely have a chart showing this relationship — at least with regard to how it meshes with your camera’s setting choices.  I’ve shown a simple chart here, but if you really want to read in-depth, you might start with Wikipedia or these guys or maybe these other guys.

chart illustrating the range of color temperatures in degrees kelvin
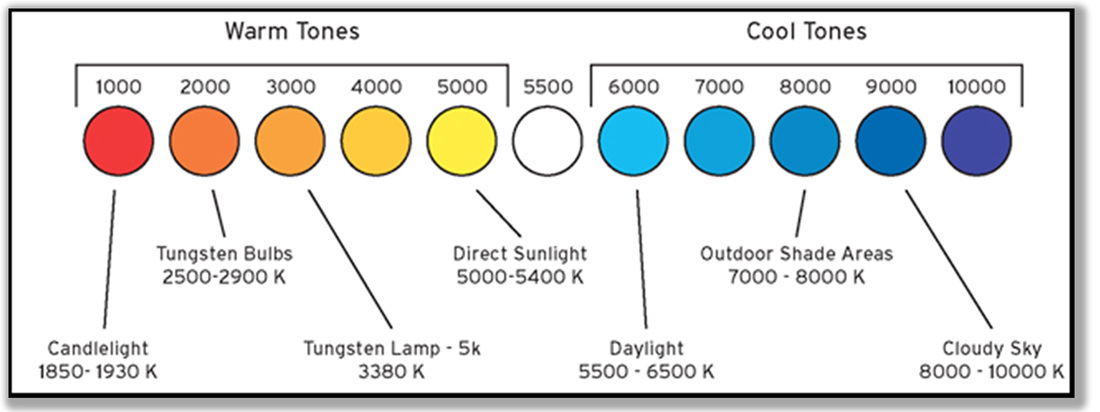
Color 'Temperature' Chart
Since I do most of my shooting outside in daylight, and since daylight white balance is probably the easiest color temperature for the camera to determine, I often delegate this chore to the camera’s computer.  I use Auto-WB a vast majority of the time.  But, I do look at the different WB settings available to see what differences it might make.
 
These shots show the camera overlaying the menu control on the monitor image to give you an indication of what the specific WB setting will produce.  It is only an indication, though, so experiment to see how this might enhance your imagery.

Picture
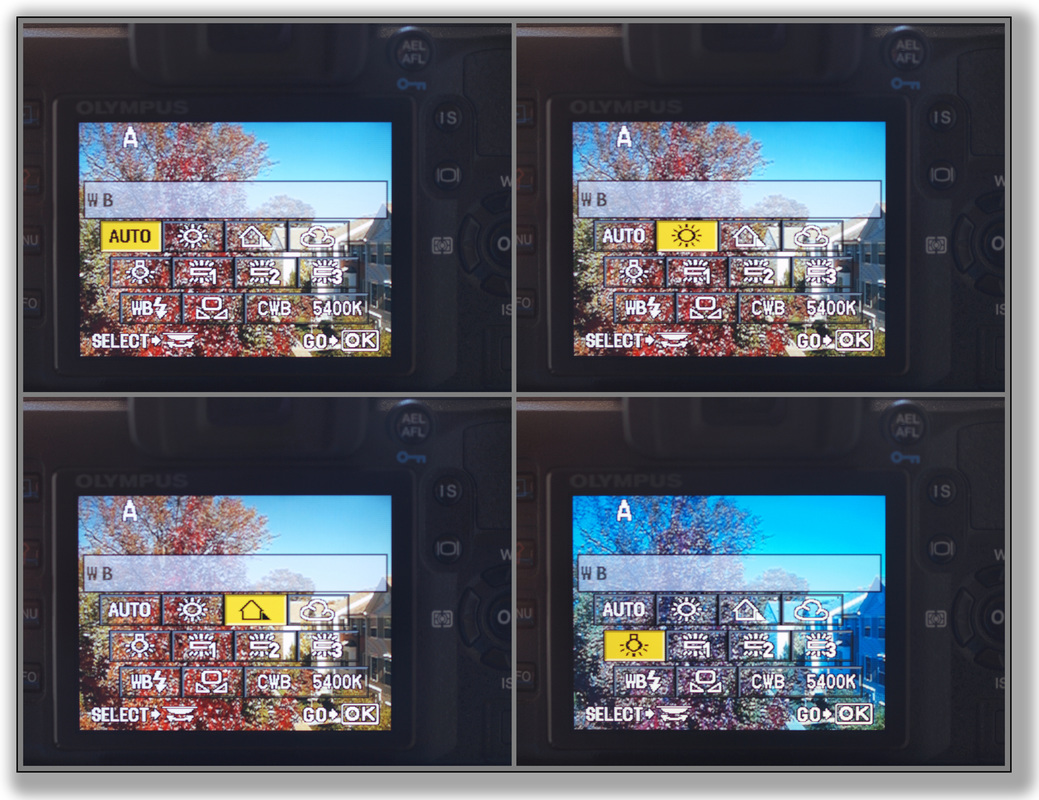
White Balance Settings
note the differences in warm vs. cool tones
  • The Auto and Daylight are very close, with the Daylight being just a bit more “correct”; probably due to its being a bit more targeted to the actual conditions.

  • The shade setting unnecessarily brought out some more reds and yellows since these would have been reduced in a shaded setting, but they weren’t reduced in the actual full-on daylight here.

  • And the Incandescent setting thought there was going to be waaayyy too much red and yellow in that light so it removed a bunch of this resulting in a shot that is much too blue.

You can also set a custom WB.  Probably most applicable to strict studio work where you don’t have pure daylight but maybe a mix of daylight from a window (a very, variable light source) mixed with artificial light from incandescent or fluorescent lights of who-knows-what temperature, and possibly your flash added in.  You’ll find the instructions to do this in your camera manual.
 
So after all that, you decided to just use Auto White Balance?  OK, but you’re not out of the woods, yet!  There are still potential issues related to an over abundance of — or lack of — light on and around your subject, i.e., the quantity of light.
 
  • Too little light; your subject and surroundings range from dark to darker
  • Too much light; your subject is so bright all you get is over-exposed or over-saturated color
  • Uneven light; mottled or spotty light coverage
  • Light on the wrong spot; your hook is left in the dark
  • Shadows cutting across your field of view; your scene is gravely unevenly lit
 
These problems can all be addressed by one, or both, of two solutions.  You need to either add light or you need to reduce light at a given spot.  I’m not going to cover flash here — that, too, could be a book in itself — but rather some techniques for rearranging the available light; for bringing light to a subject and for reducing the light falling on your subject.
 
Of course you can buy all sorts of reflectors, shades, umbrellas, diffusers, and don’t even start talking about light sources!  But you can also do a very serviceable job with little-to-no expense.
 
  • Too little light?  You need to reflect some light from the side onto your subject.  Try a piece of metal foil.  A very white piece of foam core board will reflect a small amount of light — maybe it’s all that you need. Or try a piece of metal foil on a piece of foam core.  Move your reflector nearer and farther to change the intensity.  Be sure that the added light remains consistent from metering through shuttering.
 
  • Too much light?  Try a simple shadow — yours or your friend’s.  Use a rain umbrella or drape a large piece of fabric to the side to cast a shadow.  White would probably be best so as to not cast a color tone.  Unfortunately, when solid, a shadow is a shadow is a shadow; there’s no changing the intensity as with added light.  But read the next point . . .
 
  • Did this remove too much light?  If you don’t have a diffuser, cast a shadow with a piece of very sheer fabric or gauze or cheese cloth or white lace.  These may also add a bit of fun light mottling.
 
  • But then, maybe mottling was your initial problem.  Try backing your diffuser fabric away from your subject.  This will soften the mottles; maybe enough to do the trick.
 
  • Light on the wrong spot and shadows cutting across your scene are tougher.  You can’t feasibly light or shade a huge area, and adding spot light or spot shade is tricky.  But use these same techniques, try variations — or discover your own — and experiment.
 
When you want to expand on these light-altering techniques, there are more things you can try: metering tricks, exposure compensation, and of course, flash and other external light sources.  So try everything you can think of, and have fun experimenting!
photograph of a white Lily Flower and a dark background
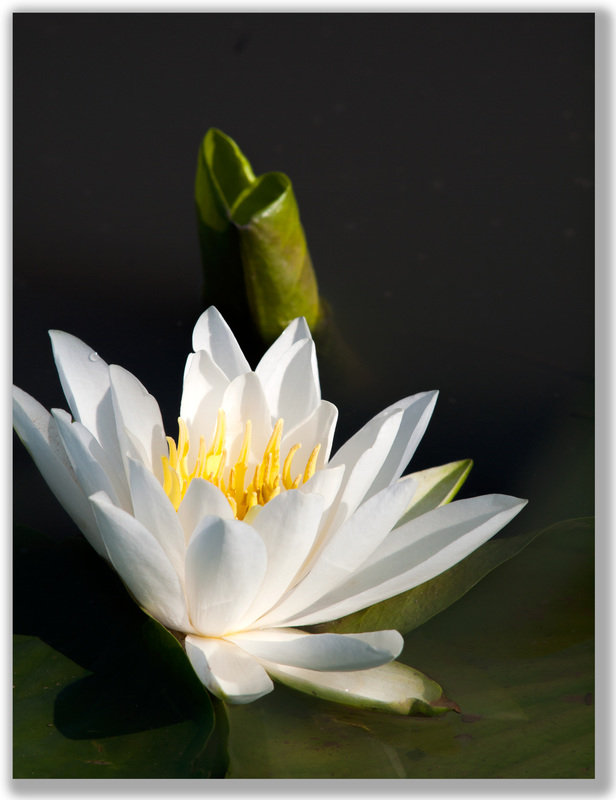
Lily Grace
photo Credit: C. Fedderson
This image, Lily Grace, shows use of metering to achieve unique lighting.  I’ll cover use of metering in a future post . . .  So Don’t Touch That Dial!
 
Thank You for visiting,
 
— Chris
 
P.s.      What really Outside-the-Box things did you try?  What worked?  What didn’t?  What gave you great — unexpected — results?  What are you going to try next?


2 Comments
Omaha Gutter Cleaning link
7/26/2022 08:20:02 pm

Your the beest

Reply
Naresh link
10/11/2022 05:50:29 am

Thanks for sharing informative article.

Reply


Leave a Reply.

    Categories

    All
    Art In Your Home
    Art Shows
    Color
    Define Macro
    Garden
    Introduction
    Other Fun Stuff
    Photo Equipment
    Photography
    Photo Technique
    The Arts

    RSS Feed

    Picture

    About Chris

    I am a Virginia-based photographer and gather my images while hiking in parks and natural areas here at home and in the locations I travel to.  I also love to visit arboretums and botanic gardens to find unusual and exotic subjects.

    With my photography, I explore intricate textures, repeating patterns, visual rhythms, and the emotion inherent in the infinite occurrences of Nature’s minutia. I find these are the fascinating, fundamental elements that integrate into our cohesive, synergistic — and essential — ecosystem.

    It is my hope and my goal that my viewers will gain not only an immediate connection with my images, but that this relationship will be forever evolving within their hearts as they bring a never-ending flow of life experiences to every viewing.


    Archives

    March 2017
    February 2017
    October 2016
    September 2016
    August 2016
    July 2016
    June 2016
    May 2016
    April 2016
    March 2016
    February 2016
    January 2016
    December 2015
    November 2015
    October 2015

  • Home
  • Artist
    • Behind the Scenes
    • Shows and Exhibitions
    • Endorsements
  • Contact
  • Room Views
  • Shop